Here are some basic instructions on how to install standard
floppy drives into your system. If your drive comes with instructions, then
it is recommended that you use them first. Also please note that some drives
may be installed differently than standard drives, if you are in doubt,
contact the manufacturer for information.
I also don't take responsibility if anything goes wrong!
Open the System Case
First of all, you will have to open your system case, this is
normally done by removing the screws from the back, after that lift the cover
off; most system cases have different ways of doing this, and it should be self
explanatory. You then you need to decide where the new drive is going, on the
front of the system unit, there should be an empty slot for the floppy drive to
go into, you will have to remove the blanking plate that covers the slot;
normally the drive bay covers are held in by clips at the sides, so simply push
the clips together and push the drive bay cover out.
Locate The Connector
You must make sure that you have a spare connector for the
drive. Normally the connector that connects to the existing one will have a
second drive connector on it. Floppy cables are easy to identify, as they
have a small twist in them, near the end.

You can now insert the floppy drive into the drive bay, if
you removed the drive bay cover correctly, the drive should fit successfully
into the slot.
Insert The Drive And Screws
At the sides of the slot there are
holes for fixing screws, Make sure that they are
aligned up, and insert the fixing screws, making
sure that the front of the drive is flush with the
system unit front.
Connect The Drive
Once you have found the cable, make sure that the connector at
the end is the same size and type at the floppy drive that you are using. If not
then you probably have the wrong connector, the floppy drive cable has a twist
in it, near the end, between it's two connectors.

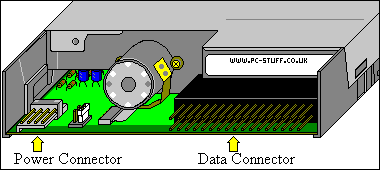
At the back of the floppy drive, there are two connectors. The
Data Connector and the power connector.
|
 |
|
The location of the connectors on the back of a
floppy drive. |
Connect the floppy connector cable to the data connector, this
cable should have a red wire on it, this is generally wire number one, this
should be on the left, when the connector is connected, the side closest to the
power connector. Contact the manufacturer if you are in doubt.
Connect The Power Connector
Next you have to locate the power connector, this is
normally a small white connector, which should fit onto the back of the
drive power connector, don't worry too much about connecting it the wrong
way round, the connector is designed so that it can only connect one way.
Bios Setup
Next you will have to enter your system BIOS to set up the
drive.
Simply boot up the system to make sure that the drive works
before putting the cover back on. If the drive light remains on constantly it is
because the data connector is on the wrong way around. Simply switch off the
system and reverse the connection, then it should work.
|